 ForgeVPS
What is a VPS? Set up your first one with Hetzner
Learn what a VPS is and what you can do with one. Create a Hetzner server, then connect with a terminal, Termius, or ForgeVPS.
On this page
Want a place to run your website or app?
A VPS gives you a small computer on the internet. You rent it. You choose what it runs.
This guide will help you:
Learn what a VPS does.
Create one with Hetzner.
Connect from a laptop, a phone, or ForgeVPS.
What is a VPS?
VPS stands for virtual private server.
Think of it as a computer you rent far from home. It has its own system, memory, and files.
It lives inside a larger physical server. Other people can rent parts of that server too. Your VPS runs in its own space.
You control it over the internet. You do not need a screen or keyboard plugged into it.
Learn more in AWS's guide to VPS hosting.
Why would you use a VPS?
Your laptop goes to sleep. A VPS can keep your app online when it does.
Here are a few things you can do:
Host a website. Give people a place to visit.
Run an app. Keep your project online.
Run agents. Let it do tasks on a schedule.
Store data. Use a database for your project.
Learn Linux. Try commands on a fresh server.
You also choose which tools to install.
There is some work to do. You must keep the software up to date. You also need backups for files you care about.
Just need a basic web page? A website builder or static host may be simpler.
Before you start
You will need:
A Hetzner account and a way to pay.
A laptop or phone with internet access.
A few minutes to choose your server and login key.
You do not need a domain name yet. We will use the server's IP address. That is its address on the internet.
Hetzner charges for the VPS. ForgeVPS is a separate service. Termius also has its own plans.
Pick how you want to connect
Choose one path and follow it from creating your server to your first connection. ForgeVPS is selected below so you can set up a full browser workspace. The other paths take you to a command-line connection.
All three use SSH for encrypted connections. You can add another way to connect later.
Set up your VPS with ForgeVPS
Get a workspace for your server: browse files, edit code, deploy apps, manage databases, and open a terminal—all in your browser.
See your files and edit code in the browser without switching between a separate SSH client, file browser, and editor.
Deploy apps and manage databases from the same workspace, with a terminal ready for commands and your server-side AI tools.
Let ForgeVPS generate the SSH key and guide you through connecting. No local SSH client setup is needed for this path.
Sign in from another device to reach the same machines without configuring a new SSH client there.
Step 1: Open Hetzner Cloud
Go to Hetzner Console.
Create an account, or sign in.
Complete any account checks Hetzner asks for.
Open a project, or create one called My first VPS.
From your project dashboard, open Create Resource and choose Servers.
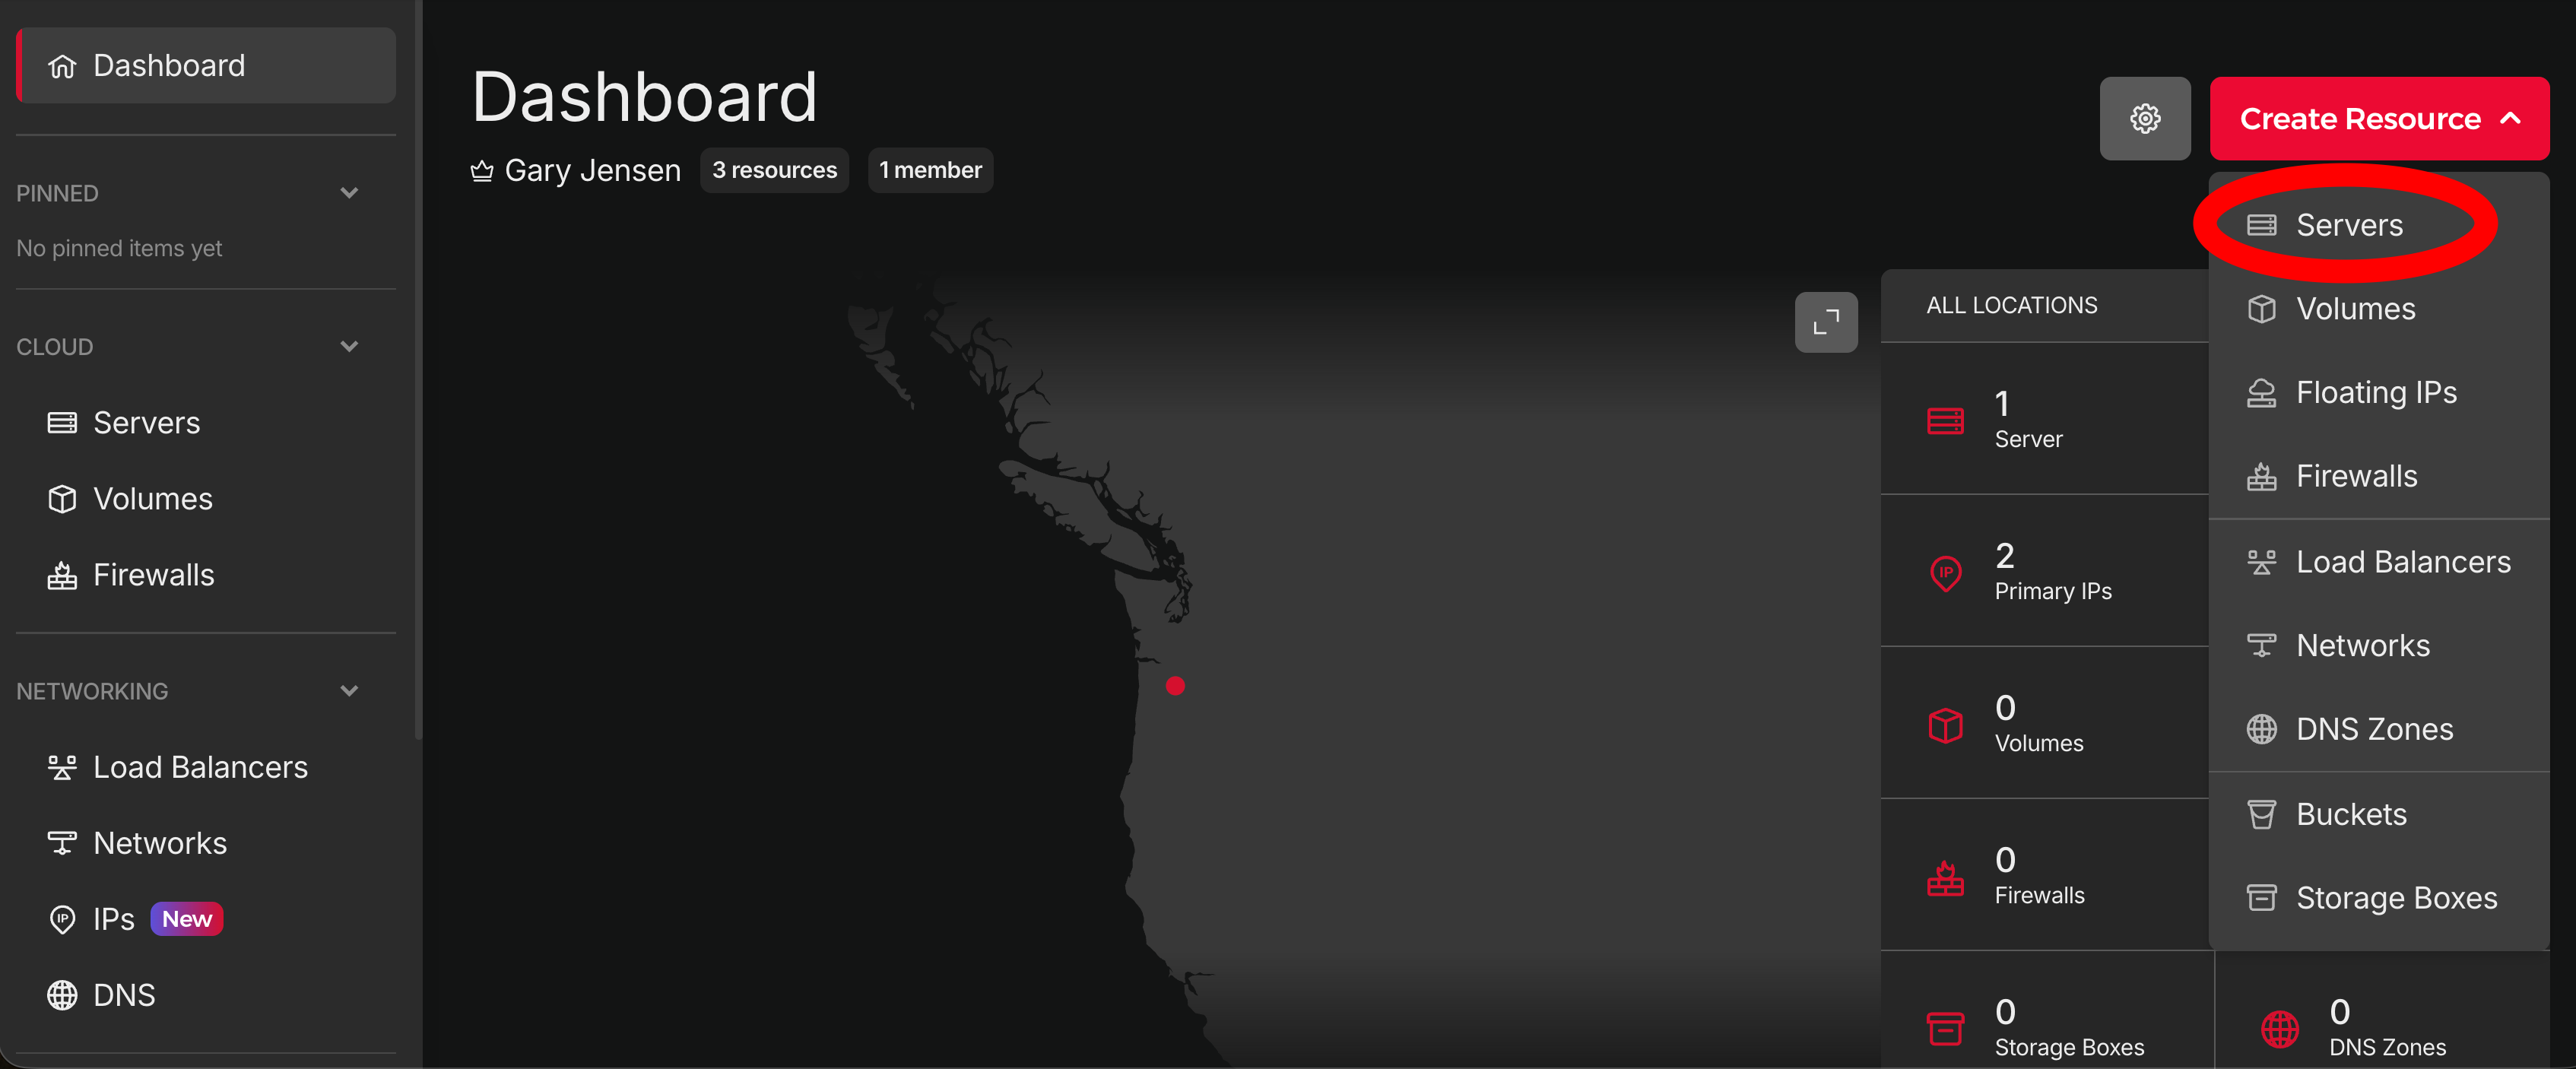
A project is a group for your servers. You only need one for this guide.
Step 2: Choose your server
The form has a lot of choices. Start with these.
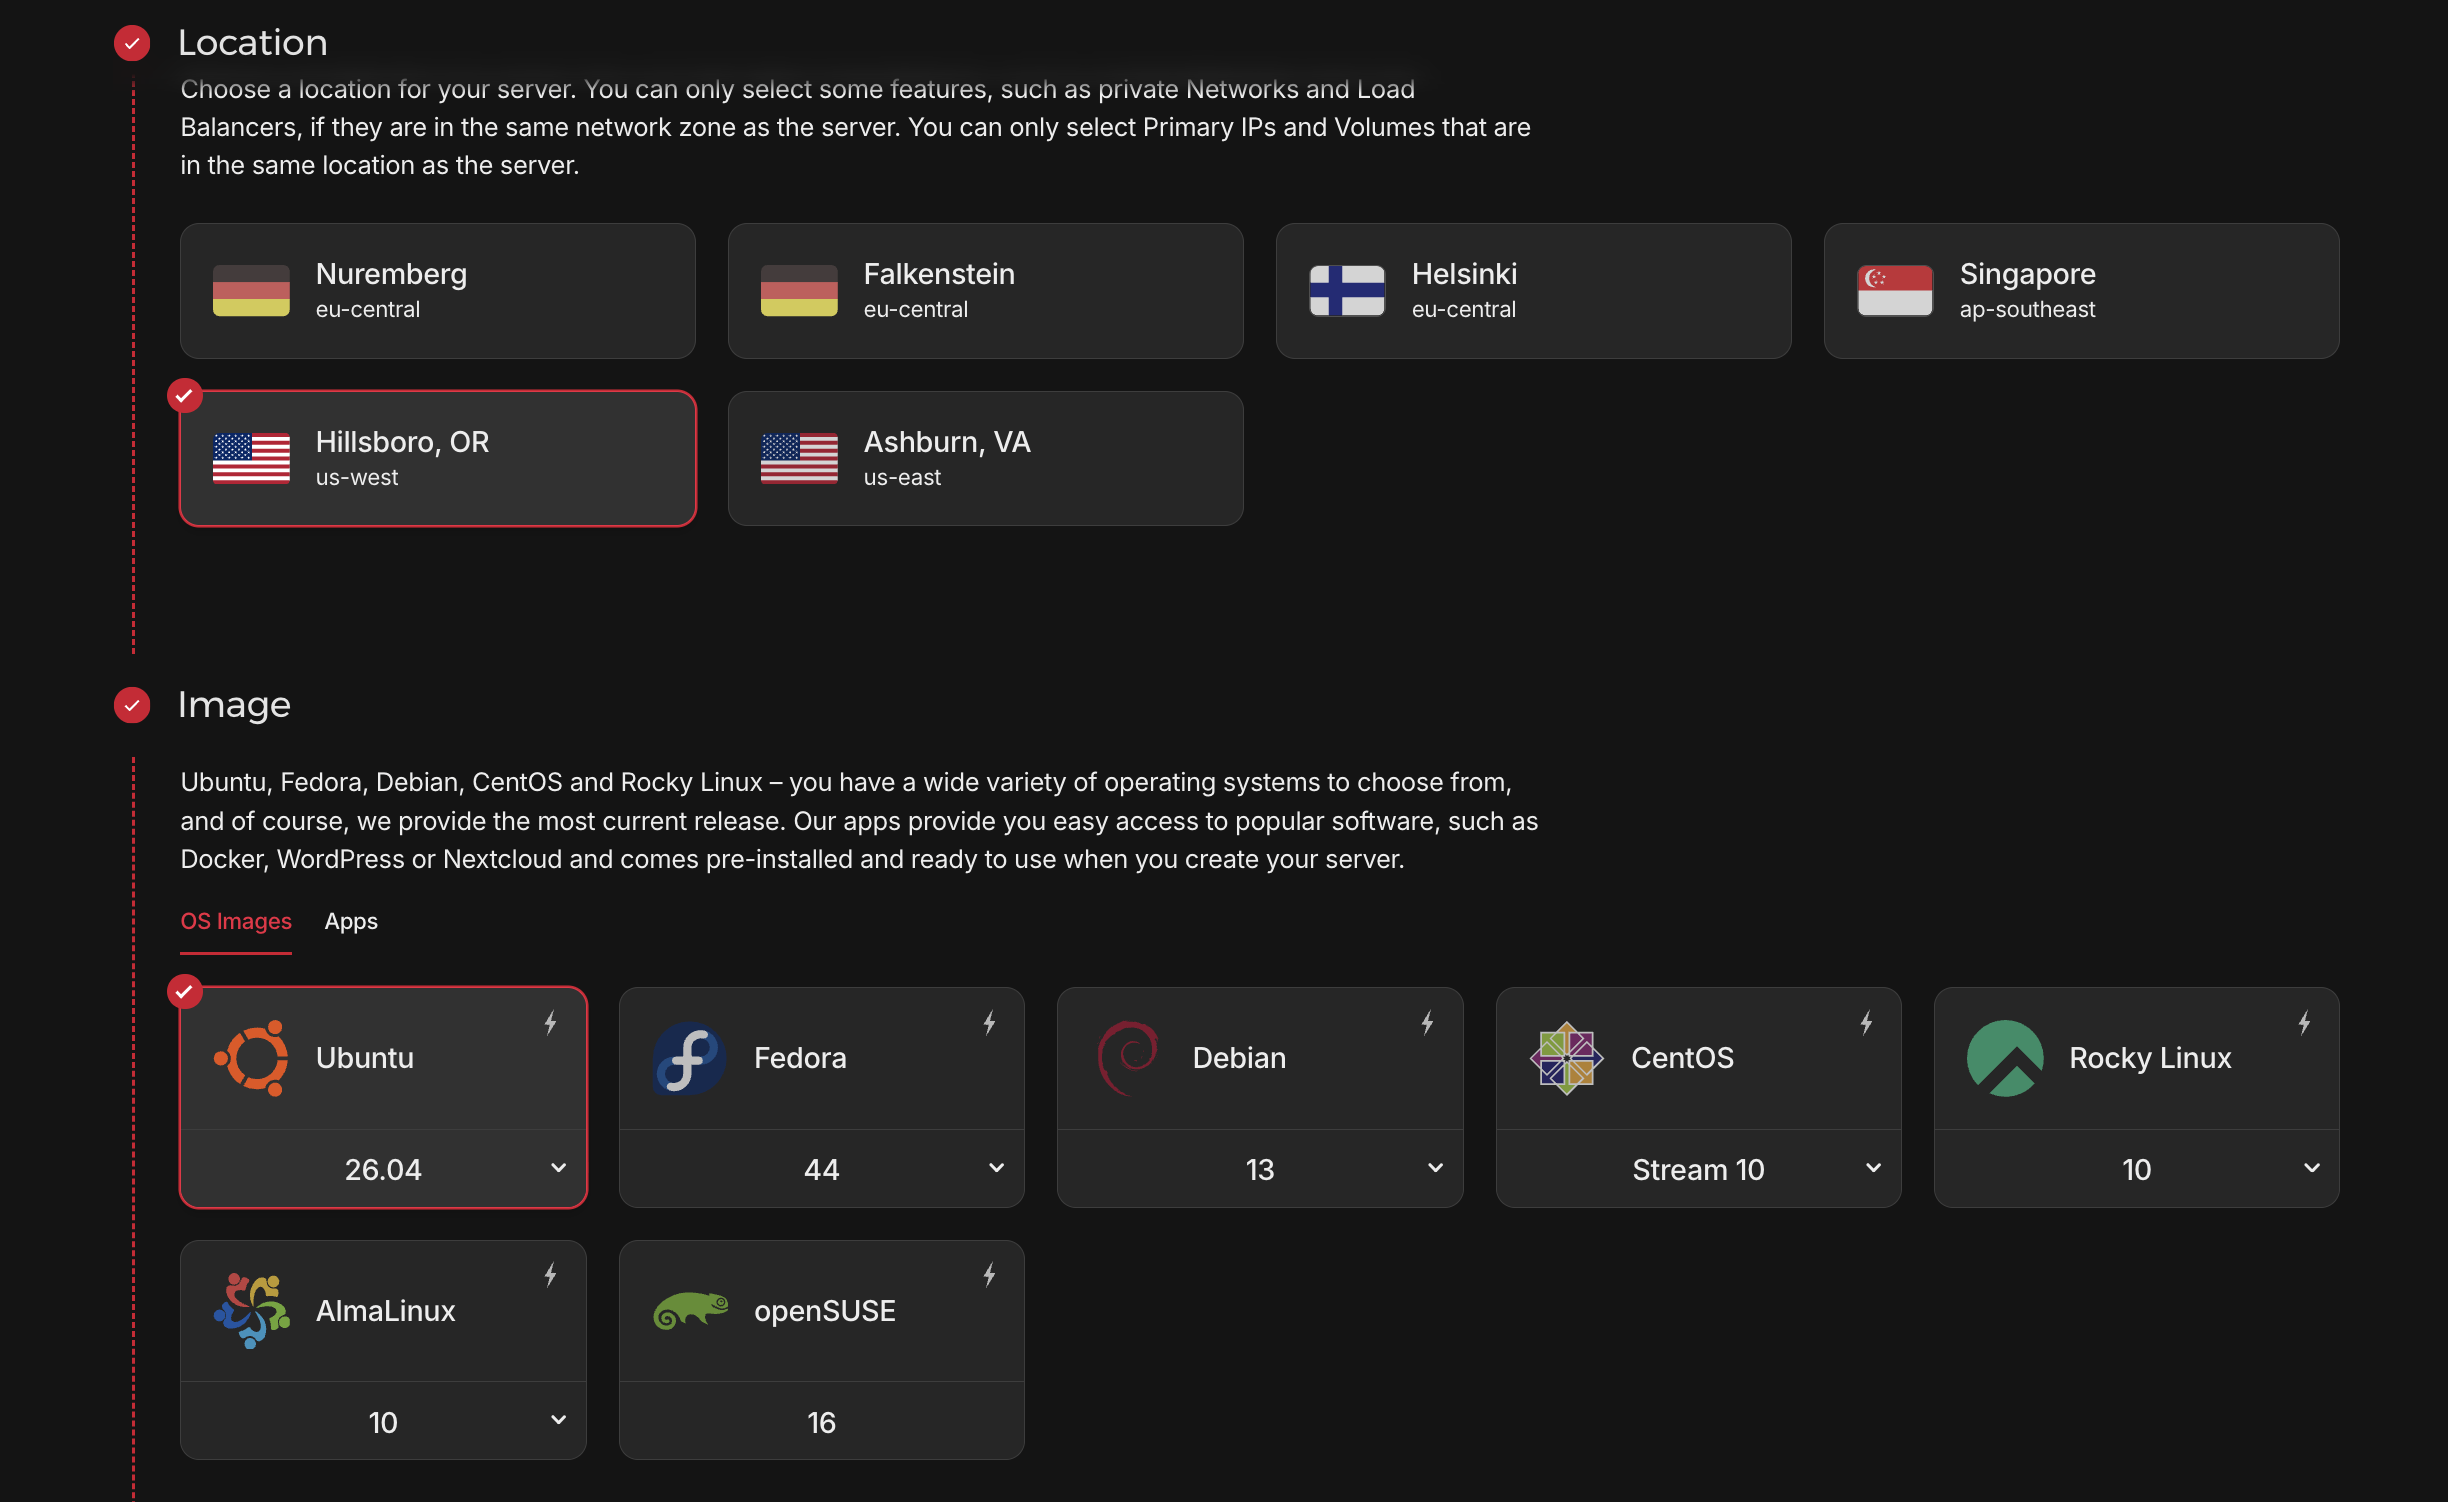
Location
Pick a place near you or the people who will use your app.
Image
Choose a plain Ubuntu LTS image.
Ubuntu is the server's operating system. LTS means it gets support for a long time.
Skip images with apps already installed for this walkthrough.
Type and size
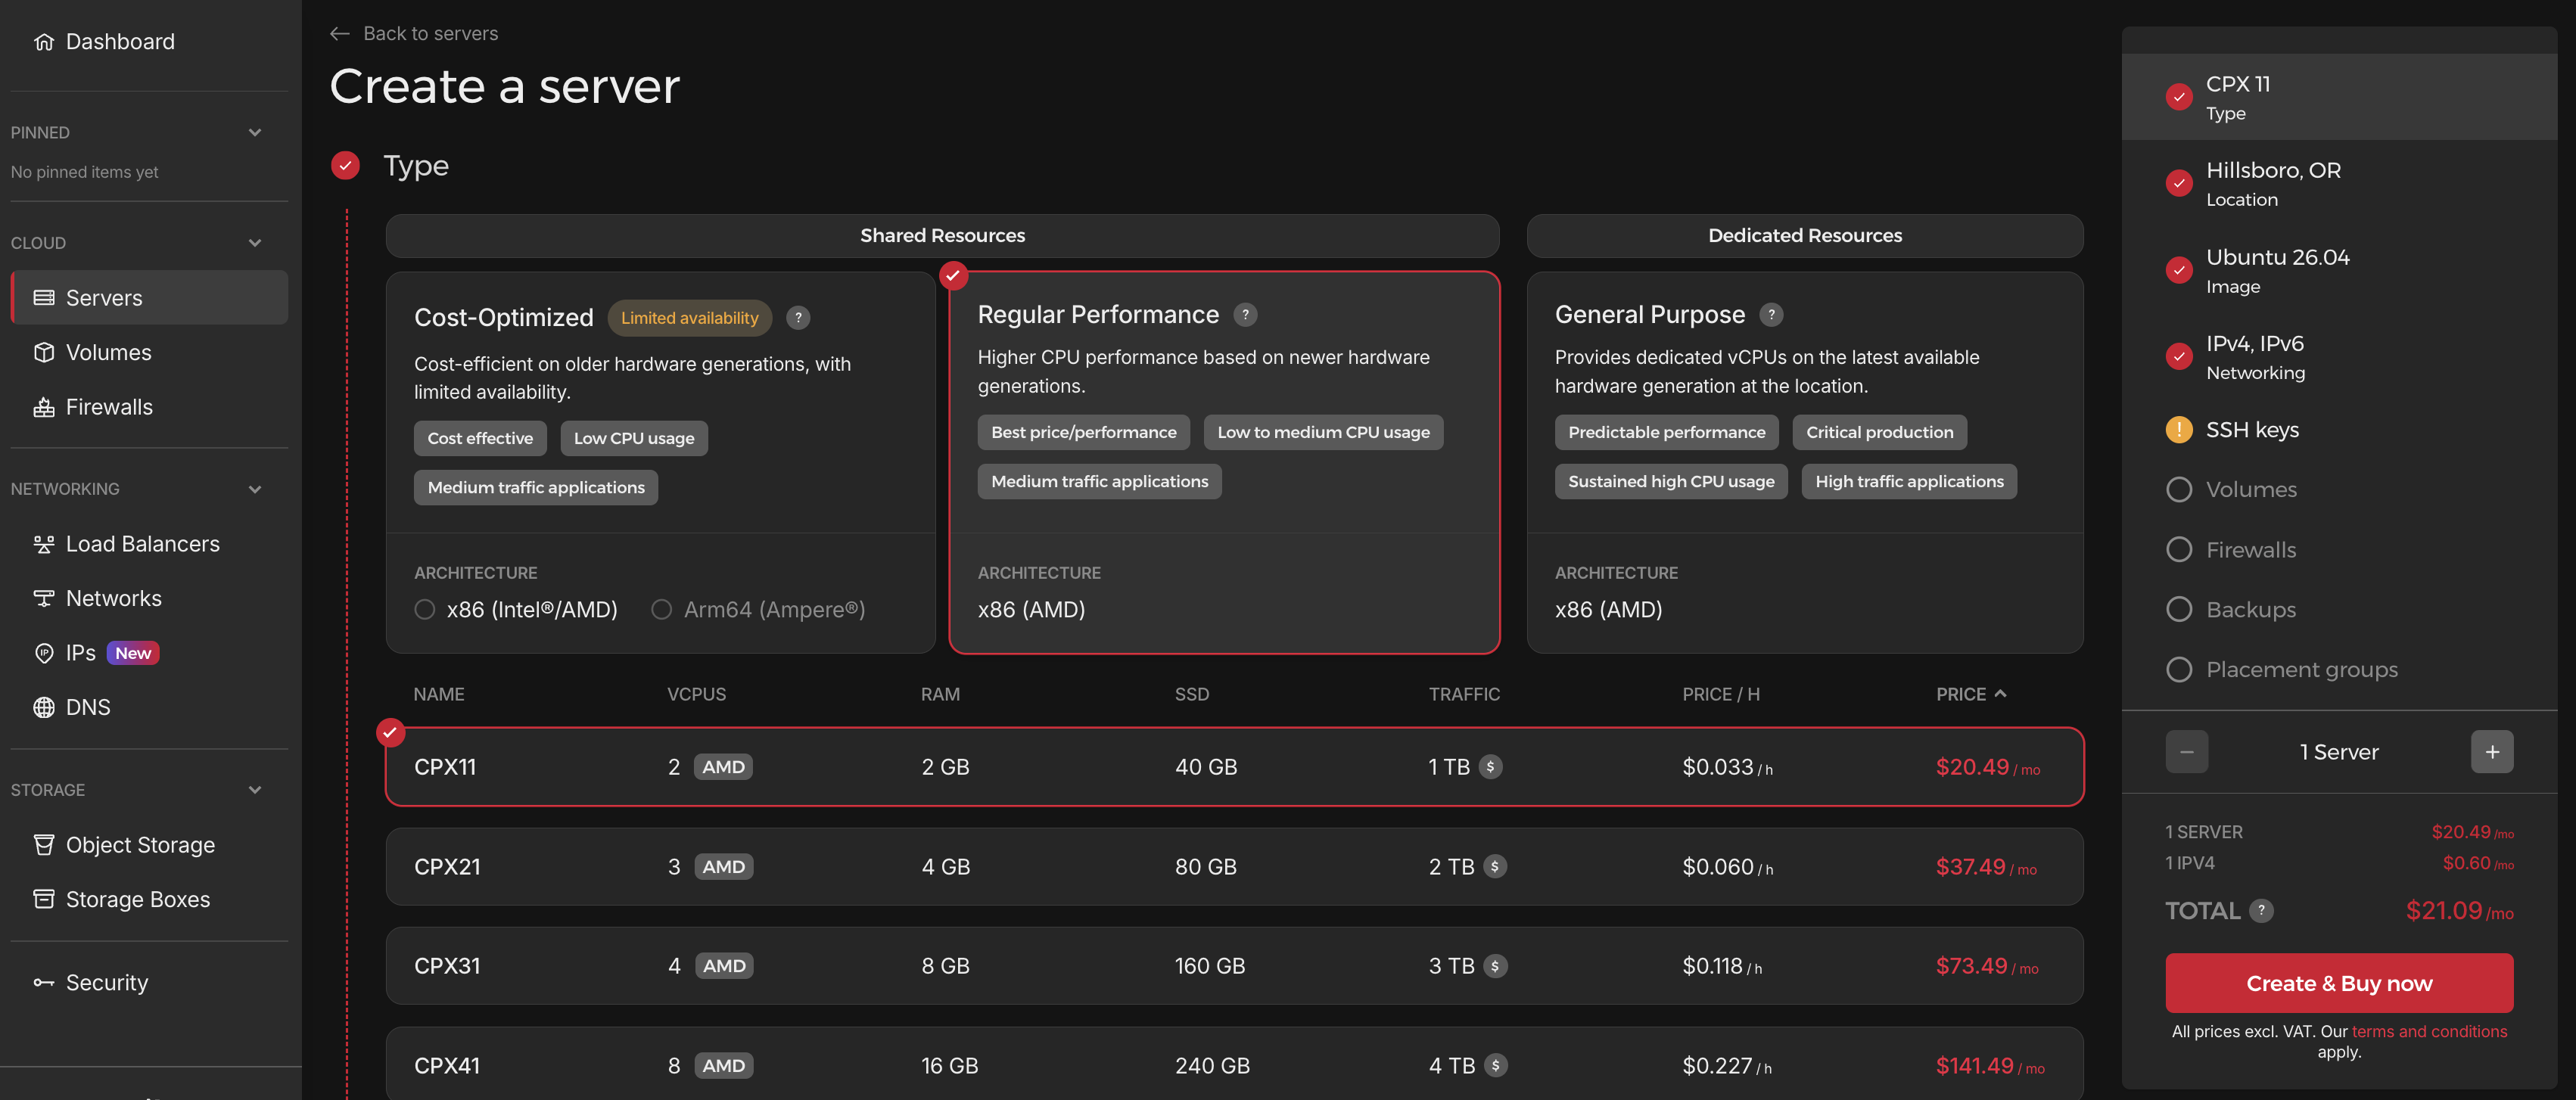
For a first small project, I would start with a shared x86 plan and 4 GB of RAM.
x86 is a common CPU type.
This is a starting point. A large app may need more.
vCPU: the server's processing power.
RAM: memory for the work it is doing now.
Disk: space for your code and files.
A shared plan shares CPU time with other servers. It costs less than dedicated CPU time.
Use Hetzner's server overview to compare the types.
Networking
Turn on Public IPv4. Leave IPv6 on too if you want.
This guide uses IPv4. ForgeVPS also needs it for setup.
Leave extra storage and private networks alone for now.
Hetzner's server creation guide explains the form.
Step 3: Add your SSH key
An SSH key helps prove that you may use the server.
It has two parts:
Public key: goes on the server.
Private key: stays with the tool that connects.
Only paste the public part into Hetzner.
Get your ForgeVPS key
Want to work in your browser? ForgeVPS can make a key for you.
How access works: ForgeVPS uses SSH for encrypted connections. It stores its private key encrypted on its backend. The backend can unlock it to connect as root. Root means full control of the VPS. This access lasts until you revoke it.
Read how ForgeVPS handles access before adding the key.
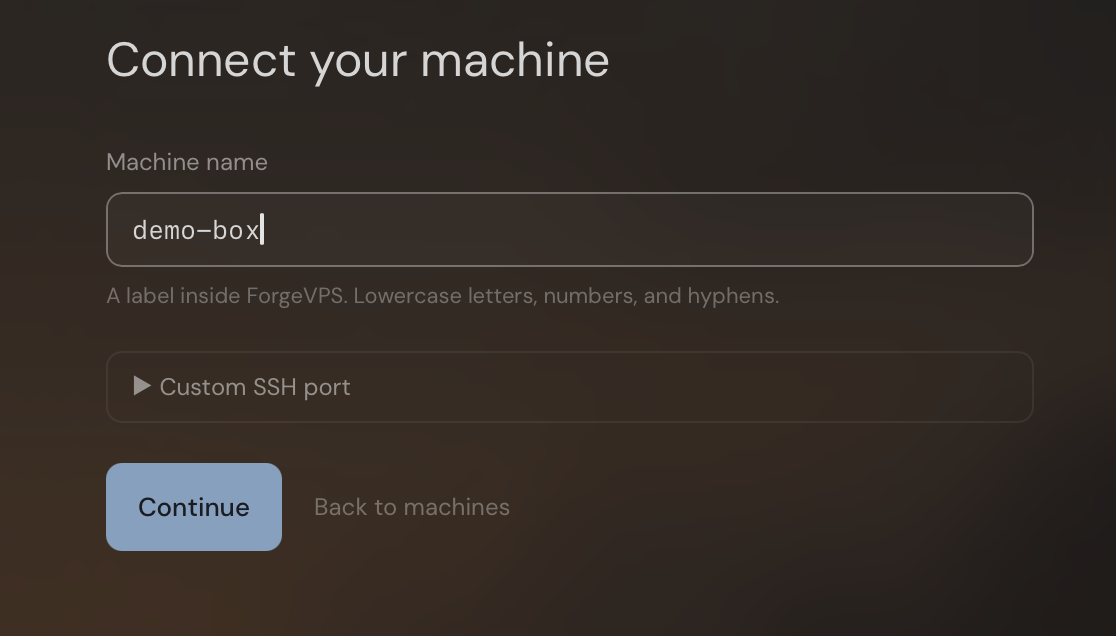
Open Connect your machine and sign in.
Name it my-first-vps. Leave the SSH port at 22.
Click Continue.
Choose New VPS, then Hetzner.
Follow the steps to the public key. Copy it.

Keep this ForgeVPS tab open. We will come back to it.
Keep your own SSH key too, if you have one. It gives you another way in.
Select your key in Hetzner
Back on the Hetzner form:
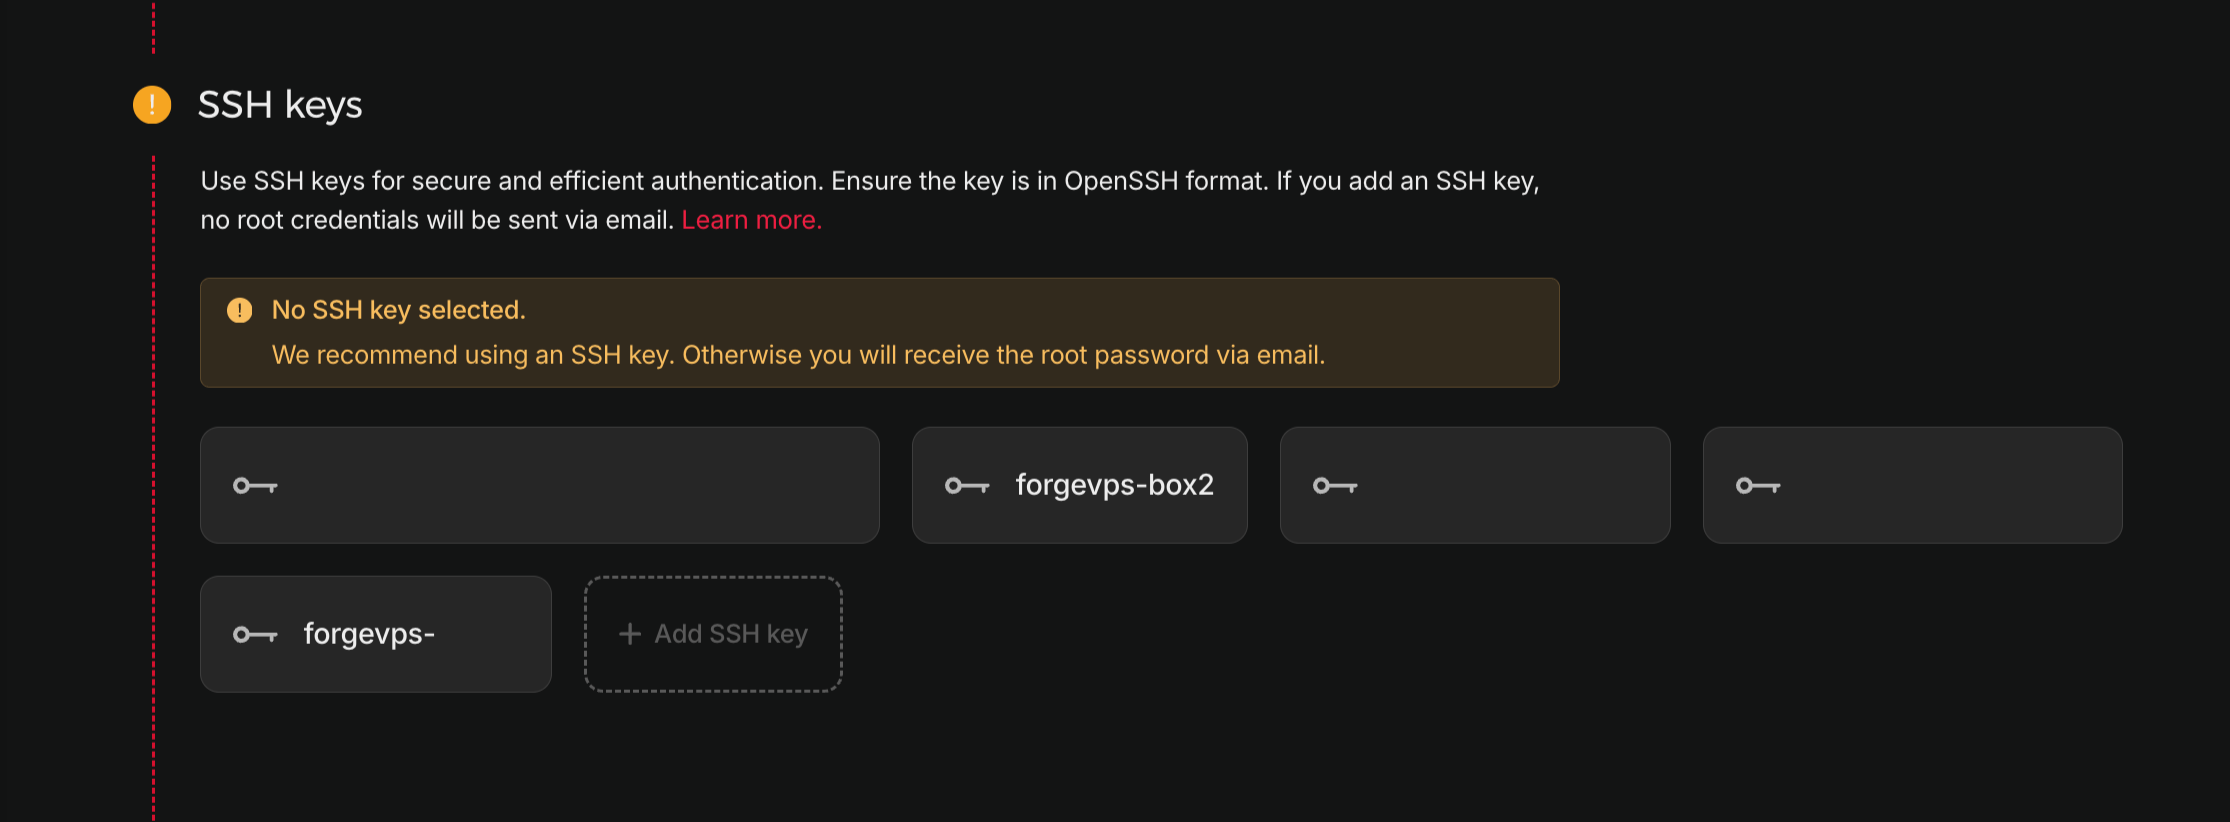
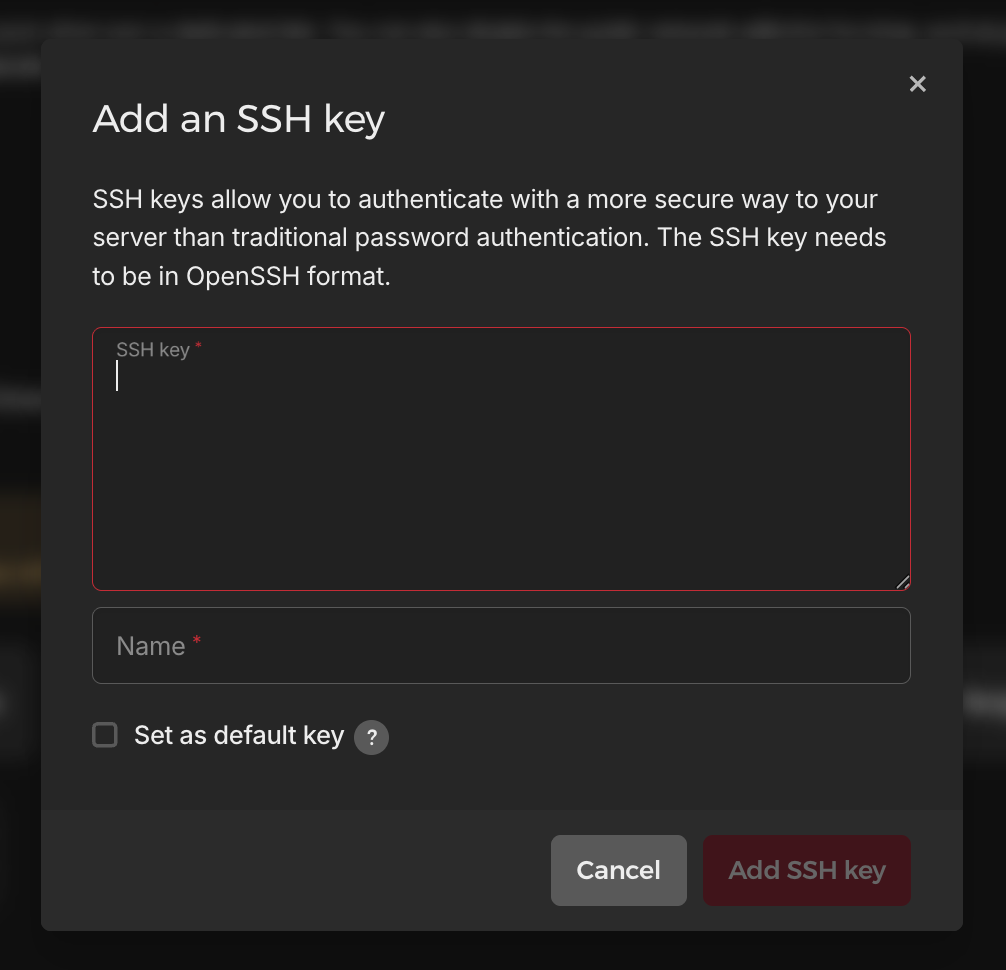
Find SSH keys and add a key.
Paste the public key you copied.
The name will auto fill in from the copied key.
Check that it is selected for this server.
You can select more than one key.
Do this before creating the VPS. Adding a key to Hetzner later does not put it on an existing server. See Hetzner's SSH key FAQ.
Step 4: Review the cost and create it
Give the server a name, such as my-first-vps.
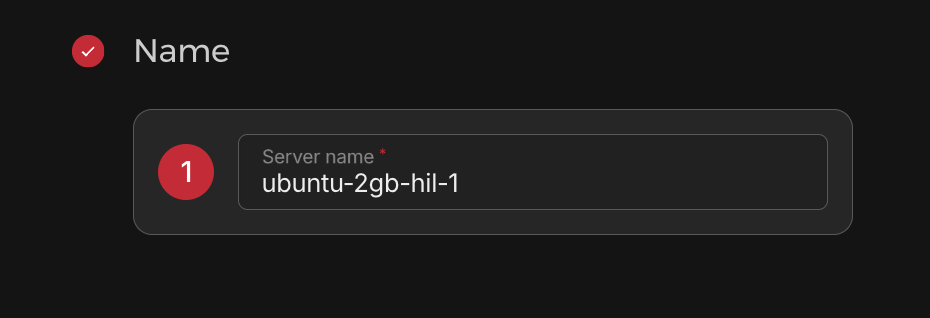
Check these items before you buy:
Ubuntu LTS is selected.
Public IPv4 is on.
Your SSH key is selected.
The plan has enough RAM and disk space.
You have reviewed extras such as backups.
You are happy with the total price shown.
Then use the create and buy button.
Wait for the server to start. Open its page and copy the public IPv4 address.
About billing: A powered-off VPS still costs money. Deleting it stops future server charges. Save any files you need first. Check for paid items left behind, such as IPs, volumes, and snapshots.
See Hetzner's billing FAQ for the current rules.
Step 5: Connect your VPS to ForgeVPS
Return to the ForgeVPS tab you kept open while creating your server.
Return to the same machine in ForgeVPS.
Finish the guide, or choose I already added the key.
Paste the server's public IPv4 address.
Click Check connection.
Wait for ForgeVPS to install its tools.
Open Terminal and run
whoami.
The terminal check confirms that you are connected. You can now use the file browser and code editor, work on app deployments, and manage databases from the same workspace.
Stuck? Try these checks
Permission denied
Check the username and selected key. Use root for this first login.
The matching public key must be on the VPS. Saving a key in Hetzner after creation is not enough.
The connection times out
Check the IPv4 address. Check that the VPS is running.
Then check the firewall. It must allow SSH from the device or service that connects.
Your password does not show as you type
That is normal in a terminal. Type it and press Enter.
You cannot get in at all
Try Hetzner's browser console.
Do not rebuild the VPS just to fix a login. A rebuild can erase your files.
Your ForgeVPS workspace is ready
Your server is connected. Open Files to browse and edit your code, use Apps & websites for your projects, or open Terminal to run a command. Your databases are in the same workspace.
Start with a small project and keep backups of anything you cannot lose. You can return to this workspace from another device by signing in to ForgeVPS.
Set up your VPS with a laptop terminal
This path gets you a command prompt on your VPS. You will use commands or install your own tools for editing files, deploying apps, and managing databases.
Step 1: Open Hetzner Cloud
Go to Hetzner Console.
Create an account, or sign in.
Complete any account checks Hetzner asks for.
Open a project, or create one called My first VPS.
From your project dashboard, open Create Resource and choose Servers.
A project is a group for your servers. You only need one for this guide.
Step 2: Choose your server
The form has a lot of choices. Start with these.
Location
Pick a place near you or the people who will use your app.
Image
Choose a plain Ubuntu LTS image.
Ubuntu is the server's operating system. LTS means it gets support for a long time.
Skip images with apps already installed for this walkthrough.
Type and size
For a first small project, I would start with a shared x86 plan and 4 GB of RAM.
x86 is a common CPU type.
This is a starting point. A large app may need more.
vCPU: the server's processing power.
RAM: memory for the work it is doing now.
Disk: space for your code and files.
A shared plan shares CPU time with other servers. It costs less than dedicated CPU time.
Use Hetzner's server overview to compare the types.
Networking
Turn on Public IPv4. Leave IPv6 on too if you want.
This guide uses the public IPv4 address for your SSH connection.
Leave extra storage and private networks alone for now.
Hetzner's server creation guide explains the form.
Step 3: Add your SSH key
An SSH key helps prove that you may use the server.
It has two parts:
Public key: goes on the server.
Private key: stays with the tool that connects.
Only paste the public part into Hetzner.
Make a key on your laptop
Open Terminal on Mac or Linux. On Windows, open PowerShell.
Run this on your computer:
ssh-keygen -t ed25519When it asks where to save the key, press Enter.
If a key already exists, do not overwrite it. Cancel with Ctrl+C. Use that key if it is yours and you can unlock it.
Set a passphrase when asked. It is a password for the key. Keep it somewhere safe.
Now show the public key.
Mac or Linux:
cat ~/.ssh/id_ed25519.pubWindows PowerShell:
Get-Content "$env:USERPROFILE\.ssh\id_ed25519.pub"Copy the whole line. It starts with ssh-ed25519.
These paths use the default file name. If you saved it elsewhere, use that path instead.
On Windows, a missing ssh-keygen command may mean you need OpenSSH Client. You only need the client to connect.
More detail: Hetzner's SSH key guide.
Select your key in Hetzner
Back on the Hetzner form:
Find SSH keys and add a key.
Paste the public key you copied.
Give it a clear name and save it.
Check that it is selected for this server.
You can select more than one key.
Do this before creating the VPS. Adding a key to Hetzner later does not put it on an existing server. See Hetzner's SSH key FAQ.
Step 4: Review the cost and create it
Give the server a name, such as my-first-vps.
Check these items before you buy:
Ubuntu LTS is selected.
Public IPv4 is on.
Your SSH key is selected.
The plan has enough RAM and disk space.
You have reviewed extras such as backups.
You are happy with the total price shown.
Then use the create and buy button.
Wait for the server to start. Open its page and copy the public IPv4 address.
About billing: A powered-off VPS still costs money. Deleting it stops future server charges. Save any files you need first. Check for paid items left behind, such as IPs, volumes, and snapshots.
See Hetzner's billing FAQ for the current rules.
Step 5: Connect from your laptop
In the examples, 203.0.113.10 is a sample IP. Replace it with your server's IPv4 address.
On your computer, run:
ssh root@203.0.113.10root is the first admin user on Hetzner's plain Ubuntu image.
If you chose a different key file, tell SSH where it is:
ssh -i /path/to/your/private-key root@203.0.113.10Use the private key here. The .pub file is for the server.
The first time, SSH may show a host fingerprint. This is the server's ID. Use the check below before you accept it.
Enter your key's passphrase if asked.
You should now see a server prompt. Type:
whoamiFor this login, it should print root.
You are in. Commands now run on the VPS.
Type exit to leave. Use the same SSH command to return.
Hetzner's connection guide covers the login details.
Check the server's fingerprint
This check is for the first Terminal or Termius login.
Sign in to Hetzner Console. Open your server.
Open its browser console using the console icon.
Log in as
rootwith the server's root password.
No root password? Use Rescue → Reset Root Password on the server page. Use the new password in the browser console. This is not your Hetzner account password.
In that browser console, run:
for key in /etc/ssh/ssh_host_*_key.pub; do ssh-keygen -lf "$key"; doneFind the key type shown by your SSH app, such as ED25519. Its SHA256: value must match.
If it does, return to your SSH app and accept it. If it does not, stop and check the IP and server.
See Hetzner's console guide and OpenSSH's fingerprint command.
Stuck? Try these checks
Permission denied
Check the username and selected key. Use root for this first login.
The matching public key must be on the VPS. Saving a key in Hetzner after creation is not enough.
The connection times out
Check the IPv4 address. Check that the VPS is running.
Then check the firewall. It must allow SSH from the device or service that connects.
Your password does not show as you type
That is normal in a terminal. Type it and press Enter.
The server's fingerprint has changed
Do not skip the warning. Check whether you rebuilt the server or used the wrong IP.
Use the console check above to confirm its identity.
You cannot get in at all
Try Hetzner's browser console.
Do not rebuild the VPS just to fix a login. A rebuild can erase your files.
Your server is ready for its next job
You have a VPS and a way to reach it.
Start small. Try a few commands. Then put your first project on it.
Want a place to work without jumping between tools?
Connect your VPS to ForgeVPS and bring your terminal, files, and apps into one browser workspace.
Set up your VPS with Termius on your phone
This path uses a phone SSH app to reach a command prompt on your VPS. App deployment and database setup are tasks you handle through commands or separate tools.
Step 1: Open Hetzner Cloud
Go to Hetzner Console.
Create an account, or sign in.
Complete any account checks Hetzner asks for.
Open a project, or create one called My first VPS.
From your project dashboard, open Create Resource and choose Servers.
A project is a group for your servers. You only need one for this guide.
Step 2: Choose your server
The form has a lot of choices. Start with these.
Location
Pick a place near you or the people who will use your app.
Image
Choose a plain Ubuntu LTS image.
Ubuntu is the server's operating system. LTS means it gets support for a long time.
Skip images with apps already installed for this walkthrough.
Type and size
For a first small project, I would start with a shared x86 plan and 4 GB of RAM.
x86 is a common CPU type.
This is a starting point. A large app may need more.
vCPU: the server's processing power.
RAM: memory for the work it is doing now.
Disk: space for your code and files.
A shared plan shares CPU time with other servers. It costs less than dedicated CPU time.
Use Hetzner's server overview to compare the types.
Networking
Turn on Public IPv4. Leave IPv6 on too if you want.
This guide uses the public IPv4 address for your SSH connection.
Leave extra storage and private networks alone for now.
Hetzner's server creation guide explains the form.
Step 3: Add your SSH key
An SSH key helps prove that you may use the server.
It has two parts:
Public key: goes on the server.
Private key: stays with the tool that connects.
Only paste the public part into Hetzner.
Make a key on your phone
Install Termius for iPhone or Android. Open it and finish its account setup.
Open Vaults, then Keychain.
On iPhone, tap +, then Generate Key.
On Android, tap +, New SSH Key, then Generate new SSH Key.
Name it My first VPS. Choose Ed25519.
Set a passphrase, then save or generate the key.
Open the saved key and copy its public key.
Keep the private key in Termius. Do not paste it into Hetzner.
The Termius key guide shows both phone layouts.
Select your key in Hetzner
Back on the Hetzner form:
Find SSH keys and add a key.
Paste the public key you copied.
Give it a clear name and save it.
Check that it is selected for this server.
You can select more than one key.
Do this before creating the VPS. Adding a key to Hetzner later does not put it on an existing server. See Hetzner's SSH key FAQ.
Step 4: Review the cost and create it
Give the server a name, such as my-first-vps.
Check these items before you buy:
Ubuntu LTS is selected.
Public IPv4 is on.
Your SSH key is selected.
The plan has enough RAM and disk space.
You have reviewed extras such as backups.
You are happy with the total price shown.
Then use the create and buy button.
Wait for the server to start. Open its page and copy the public IPv4 address.
About billing: A powered-off VPS still costs money. Deleting it stops future server charges. Save any files you need first. Check for paid items left behind, such as IPs, volumes, and snapshots.
See Hetzner's billing FAQ for the current rules.
Step 5: Connect from your phone
Open Termius and add a Host.
Name it My first VPS.
Enter your server's public IPv4 address.
Use port 22 and username root.
Choose the key you made in Step 3.
Save the host, then tap it to connect.
Check the host fingerprint before you accept it. Enter your key's passphrase if asked.
Run whoami. If it prints root, you are connected.
You can now use server commands from your phone.
See Termius's connection guide for more help.
Check the server's fingerprint
This check is for the first Terminal or Termius login.
Sign in to Hetzner Console. Open your server.
Open its browser console using the console icon.
Log in as
rootwith the server's root password.
No root password? Use Rescue → Reset Root Password on the server page. Use the new password in the browser console. This is not your Hetzner account password.
In that browser console, run:
for key in /etc/ssh/ssh_host_*_key.pub; do ssh-keygen -lf "$key"; doneFind the key type shown by your SSH app, such as ED25519. Its SHA256: value must match.
If it does, return to your SSH app and accept it. If it does not, stop and check the IP and server.
See Hetzner's console guide and OpenSSH's fingerprint command.
Stuck? Try these checks
Permission denied
Check the username and selected key. Use root for this first login.
The matching public key must be on the VPS. Saving a key in Hetzner after creation is not enough.
The connection times out
Check the IPv4 address. Check that the VPS is running.
Then check the firewall. It must allow SSH from the device or service that connects.
Your password does not show as you type
That is normal in a terminal. Type it and press Enter.
The server's fingerprint has changed
Do not skip the warning. Check whether you rebuilt the server or used the wrong IP.
Use the console check above to confirm its identity.
You cannot get in at all
Try Hetzner's browser console.
Do not rebuild the VPS just to fix a login. A rebuild can erase your files.
Your server is ready for its next job
You have a VPS and a way to reach it.
Start small. Try a few commands. Then put your first project on it.
Want a place to work without jumping between tools?
Connect your VPS to ForgeVPS and bring your terminal, files, and apps into one browser workspace.